本文共 3231 字,大约阅读时间需要 10 分钟。
死锁(产生的条件、死锁避免(银行家算法)、死锁检测)
死锁(deadlock)
1、定义
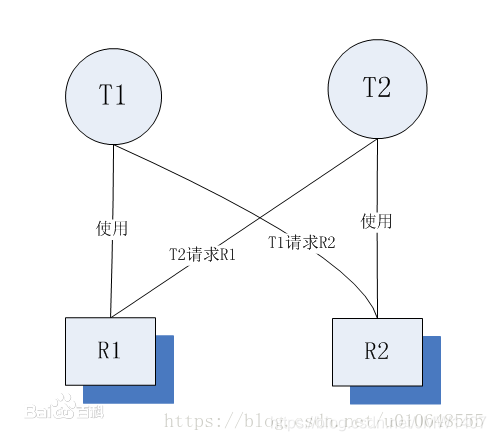
线程死锁是指由于两个或者多个线程互相持有对方所需要的资源,导致这些线程处于等待状态,无法前往执行。当线程进入对象的synchronized代码块时,便占有了资源,直到它退出该代码块或者调用wait方法,才释放资源,在此期间,其他线程将不能进入该代码块。当线程互相持有对方所需要的资源时,会互相等待对方释放资源,如果线程都不主动释放所占有的资源,将产生死锁。
2、产生的条件
1、互斥条件:进程对所分配到的资源不允许其他进程访问,若其他进程访问该资源,只能等待,直至占有该资源的进程使用完成后释放该资源;2、请求和保持条件:进程获得一定的资源后,又对其他资源发出请求,但是该资源可能被其他进程占有,此时请求阻塞,但该进程不会释放自己已经占有的资源3、不可剥夺条件:进程已获得的资源,在未完成使用之前,不可被剥夺,只能在使用后自己释放4、环路等待条件:进程发生死锁后,必然存在一个进程-资源之间的环形链 ,环路中每个进程都在等待下一个进程所占有的资源
发生死锁时,上面的情况必须同时会发生。如果其中任意一个条件不会成立,死锁就不会发生。可以通过破坏其中任意一个条件来破坏死锁,下面这些破坏条件就是我们探讨的重点
3、死锁避免
- 1、
破坏请求和等待条件。 所有的进程在开始运行之前,必须一次性地申请其在整个运行过程中所需要的全部资源 - 2、
破坏不可抢占条件。当进程新的资源未得到满足时,释放已占有的资源 - 3、
破坏环路等待条件。 系统给每类资源赋予一个序号,每个进程按编号递增的请求资源,释放则相反
3.1、银行家算法
1、问题:
一个银行家共有20亿财产第一个开发商:已贷款15亿,资金紧张还需3亿。第二个开发商:已贷款5亿,运转良好能收回。第三个开发商:欲贷款18亿
在这种情况下,如果你是银行家,你怎么处理这种情况?一个常规的想法就是先等着第二个开发商把钱收回来,然后手里有了5个亿,再把3个亿贷款给第一个开发商,等第一个开发商收回来18个亿,然后再把钱贷款给第三个开发商。
这里面什么值得学习呢?最重要的就是眼光放长一点,不要只看着手里有多少钱,同时要注意到别人欠自己的钱怎么能收回来。
2、银行家算法的实现思想
允许进程动态地申请资源,系统在每次实施资源分配之前,先计算资源分配的安全性,若此次资源分配安全(即资源分配后,系统能按某种顺序来为每个进程分配其所需的资源,直至最大需求,使每个进程都可以顺利地完成),便将资源分配给进程,否则不分配资源,让进程等待。
3.1.1、实现过程
1、数据结构
-
1、
可利用资源向量Available。这是一个含有m个元素的数组,其中的而每一个元素代表一类可利用资源数目,其初始值是系统中所配置的该类全部可用资源的数目,其数值随该类资源的分配和回收而动态的改变。如果Available[j]=K,则表示系统中现有Rj类资源K个。 -
2、
最大需求矩阵Max。这是一个n*m的矩阵,它定义了系统中n个进程中的每一个进程对m类资源的最大需求。如果Max[i,j]=K;则表示进程i需要Rj类资源的最大数目为K。 -
3、
分配矩阵Allocation。这也是一个n*m的矩阵,它定义了系统中每一类资源当前已分配给每一进程的资源数。如果Allocation[i,j]=K,则表示进程i当前已分得Rj类资源的数目为K。 -
4、
需求矩阵Need。这也是一个n*m的矩阵,用以表示每一个进程尚需的各类资源数。如果Need[i,j]=K,则表示进程i还需要Rj类资源K个,方能完成任务。上述三个矩阵间存在下述关系:
Need[i,j]=Max[i,j]-Allocation[i,j]
2、算法流程
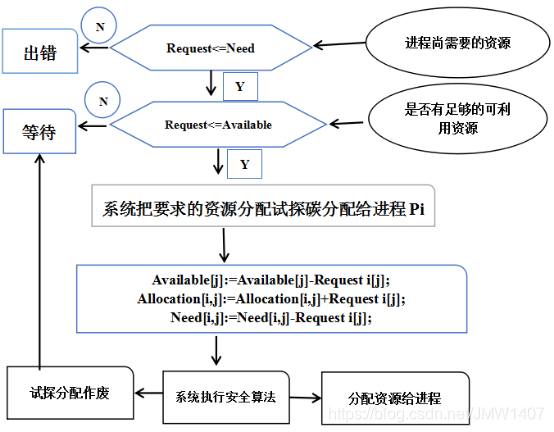
设Request i是进程Pi的申请向量,如果Request i[j]=K,则表示进程Pi需要K个Rj类型的资源。当Pi发出资源请求后,系统按下述步骤进行检查: -
如果
Request i[j]<=Need[i,j],便转向步骤2);否则认为出错,因为它所需要的资源数已经超过它所宣布的最大值。 -
如果
Request i[j]<=Available[i,j],便转向步骤3);否则,表示尚无足够资源,Pi需等待。 -
系统试探着把资源分配给进程
Pi,并修改下面数据结构中的数值:Available[j]:=Available[j]-Request i[j];Allocation[i,j]:=Allocation[i,j]+Request i[j];Need[i,j]:=Need[i,j]-Request i[j];
-
系统执行安全性算法,检查此次资源分配后系统是否处于安全状态。若安全,才正式将资源分配给进程Pi,以完成本次分配;否则,将本次的试探分配作废,恢复原来的资源分配状态,让进程Pi等待。
4、死锁检测
1、每种类型一个资源的死锁检测
每种资源类型都有一个资源是什么意思?我们经常提到的打印机就是这样的,资源只有打印机,但是设 备都不会超过一个。 如果这张图包含了一个或一个以上的环,那么死锁就存在,处于这个环中任意一个进程都是死锁的进程。
 2、每种类型多个资源的死锁检测
如果有多种相同的资源存在,就需要采用另一种方法来检测死锁。可以通过构造一个矩阵来检测从P1->Pn这n个进程中的死锁。现在我们提供一种基于矩阵的算法来检测从P1到Pn这n个进程中的死锁。假设资源类型为m,E1代表资源类型1,E2表示资源类型2,Ei代表资源类型 i(1<= i <=m)。E表示的是现有资源向量( existing resource vector),代表每种已存在的资源总数。
现在我们就需要构造两个数组:C表示的是当前分配矩阵( current allocation matrix),R表示的是请求矩阵( request matrix)。Ci表示的是P持有每一种类型资源的资源数。所以,Cj表示Pi持有资源j的数量。Rij表示Pi所需要获得的资源j的数量
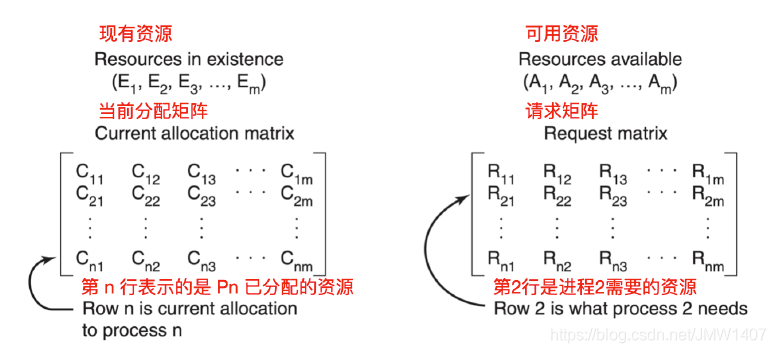 一般来说,已分配资源j的数量加起来再和所有可供使用的资源数相加 = 该类资源的总数。
 死锁的检测就是基于向量的比较。每个进程起初都是没有被标记过的,算法会开始对进程做标记,进程被标记后说明进程被执行了,不会进入死锁,当算法结束时,任何没有被标记过的进程都会被判定为死锁进程。
上面我们探讨了两种检测死锁的方式,那么现在你知道怎么检测后,你何时去做死锁检测呢?一般来
说,有两个考量标准:- 每当有资源请求时就去检测,这种方式会占用昂贵的CPU时间。
- 每隔k分钟检测一次,或者当CPU使用率降低到某个标准下去检测。考虑到CPU效率的原因,如果死锁进程达到一定数量,就没有多少进程可以运行,所以CPU会经常空闲。
5、死锁恢复
- 1、
抢占恢复。在某些情况下,可能会临时将某个资源从它的持有者转移到另一个进程。比如在不通知原进程的情况下,将某个资源从进程中强制取走给其他进程使用,使用完后又送回。这种恢复方式一般比较困难而且有些简单粗暴,并不可取。 - 2、
回滚恢复。周期性地检查进程的状态(包括请求的资源),将其写入一个文件,当发生死锁,回滚到之前的某个时间点。 - 3、
杀死进程恢复。最简单有效的解决方案是直接杀死一个死锁进程。但是杀死一个进程可能照样行不通,这时候就需要杀死别的资源进行恢复
6、鸵鸟算法
最简单的解决办法就是使用鸵鸟算法( ostrich algorithm),把头埋在沙子里,假装问题根本没有发生。每个人看待这个问题的反应都不同。数学家认为死锁是不可接受的,必须通过有效的策略来防止死锁的产生。工程师想要知道问题发生的频次,系统因为其他原因崩溃的次数和死锁带来的严重后果。如果死锁发生的频次很低,而经常会由于硬件故障、编译器错误等其他操作系统问题导致系统崩溃,那么大多数工程师不会修复死锁。
转载地址:http://ipuiz.baihongyu.com/